Windows Live Mail is the email client that comes included with most installations of Windows 7
- Open Windows Mail. You should see a link on the left side for “Add e-mail account”
- Enter your email address (i.e. “frankb@lmi.net”), password, and Display Name.
- Click the check box that says “Manually Configure server settings for this account” then click Next.
- Specify is this account is going to be POP or IMAP. Read this if you don’t know which one to choose
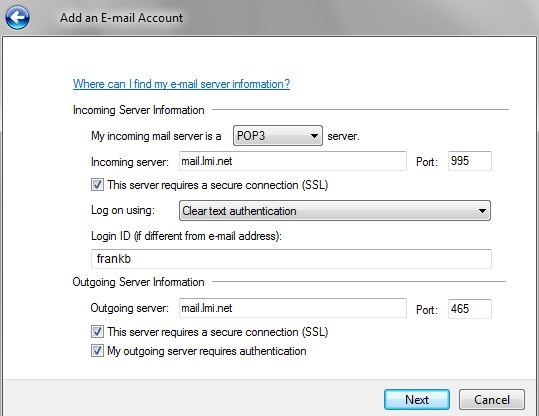
- Incoming server is mail.lmi.net.
- Click the check box for “This server requires a secure connection”. Notice that the Port # changes to 995.
- Set “Log on Using” to “Clear text authentication” if it is not already selected.
- The Login ID is your mail server account name. (For example, if your email address is “frankb@lmi.net” then your Login ID is “frankb”).
- Outgoing server is also mail.lmi.net. Change the Port to 465, then click the checkboxes for “This server requires a secure connection (SSL)” and “My outgoing server requires authentication”
Here is what the settings screen should look like
Click Next, and then OK at the next dialog, and you are finished.
If you want to edit mail account settings, right-click on the account name that appears on the left side, then choose “Properties”. You may want to do this right away if you want to change the Mail Account name that shows up on the left side of the interface.
Note: Windows Live Mail does not by default display the usual menu bar at the top that users of Outlook or Outlook Express would be familiar with. To enable the menu bar, type “Alt-M” to open the Menu Bar tool, then “m” to select “Show menu bar” (of just click the option). You will need to display the menu bar to access the Tools menu and other advances features.
Important note if you are using POP
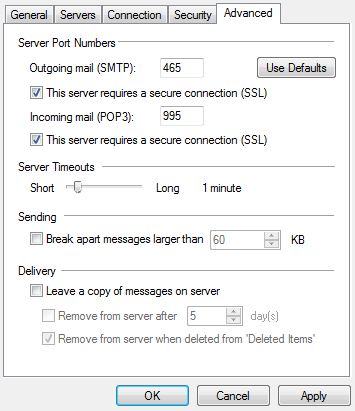
By default, Windows Live Mail will not remove messages from the server after you download them. Instead, it will delete messages off the server after you delete them from the “Deleted Items” folder. This will cause your mail spool on our mail server to fill up if you don’t empty the Deleted Items folder from time to time. This is done by right-clicking the Deleted Items folder and selecting “Empty Deleted Items folder”. If you would rather not be bothered by this, we recommend you set Windows Live Mail to delete messages from the server after downloading. This way you will never have to worry about going over quota. Here’s how to do this:
- Right-click on your account label and choose Properties
- Click the Advanced tab.
- Uncheck the box that says “Leave of copy of messages on server”
- Click OK.